Drywall is commonly used in the home, but many people don’t know why it is used. Many people know that it goes on all inside walls and that it won’t hold heavier hangings like shelves and large pictures, and we need to find the studs beneath. We may have also experienced repairing a hole that was intentionally or unintentionally placed in a wall. Plaster work is definitely something that takes practice but thankfully it is able to be sanded; therefore, our mistakes are not permanent.
What is Drywall?
Drywall (also called wallboard, gypsum board, and plasterboard) is an economical building material used to face walls and ceiling inside structures. Composed primarily of gypsum rock stretched out in a flat sheet between two pieces of thin board (or heavy paper), drywall is low-budget and easy to install. These two reasons are why it is the most commonly used interior building material throughout the world.
Forms of Drywall
White board regular
This form of drywall looks appealing and is the cheapest. It is used for those who need either a quick-fix or wish for a nice appearance at a good price.
Fire-resistive (“Type X”)
This type is a bit more expensive, for obvious reasons. This form of drywall holds up better, although it has its drawbacks as well.
Green Board
Used for washrooms and other high-humidity areas. This form of drywall absorbs moisture well.
Drywall Specifications and Types
The standard cut for drywall in the United States and Canada is 4 feet (1220 mm) wide and eight feet (2440 mm) long, although these sheets can be custom cut to exact-fit the specifications and dimensions of any home. Some industrial sheets are cut at 16 feet (4880 mm). The standard measurements for drywall in other countries are slightly different: 1200 mm wide and 2400 long, although that varies.
Thickness varies, too. Typically, drywall is from one-half inch (12mm, 12.5 mm, or 12.7 mm) to one inch (25 mm), but it slightly differs in every country, depending on that country’s building regulations and system of measurement.
The United States and Canada together possess the greatest number of gypsum board users in the world. The gypsum board (drywall) market is booming and continues to rise. This is probably due to increased real estate and the fact that an average American home contains seven metric tons of gypsum (U.S. Geological Survey), which offers the possibility that drywall might contribute to the increase in home value.
Drywall is the material for all seasons. This material provides protection and lightweight support and adds an attractive appeal to the home.It is the most commonly used interior wall covering throughout the world for several reasons. First, it is an affordable option. It is simply gypsum, which is a ubiquitous and easily obtained substance sandwiched between two sheets of heavy paper which gives the drywall stability. The material is easy to work with and therefore very useful across a wide range of applications. It also provides a nice finished surface that is paintable and repairable.
Another reason why drywall is used is that it provides a barrier to the movement of fire through a house or building. Its endothermic properties allow it to at least slow a fire’s progression and are given to it by the water that is contained within it. This water must be heated and evaporated before the fire is able to raise the temperature of drywall to its kindling point and also affect the temperature of the next room over. One must keep in mind that it is only a barrier and that in order to prevent the fire from moving quickly from one room to the next you have to block off all other routes. Therefore, any vents must be properly insulated, and other holes must be sealed tight by either plaster or some other fire retardant.
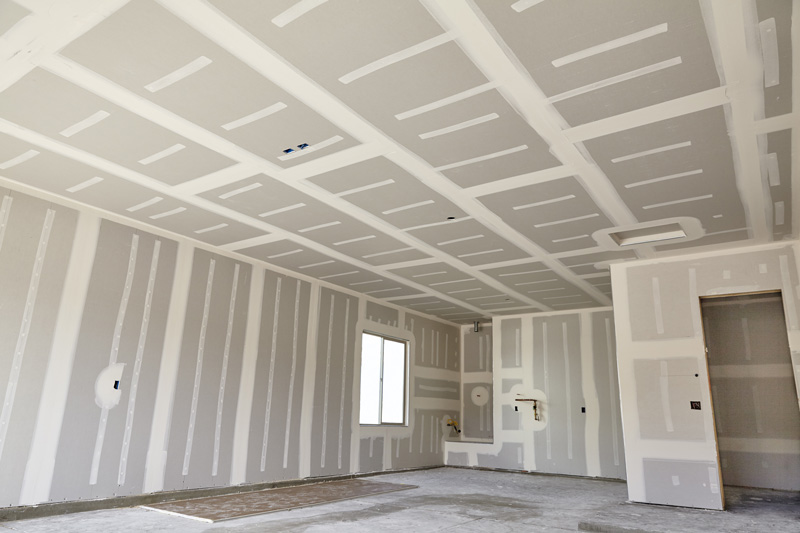
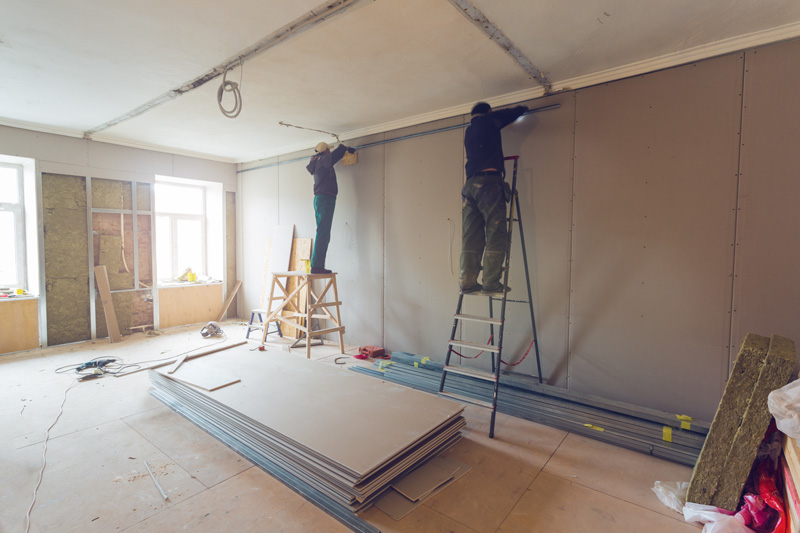
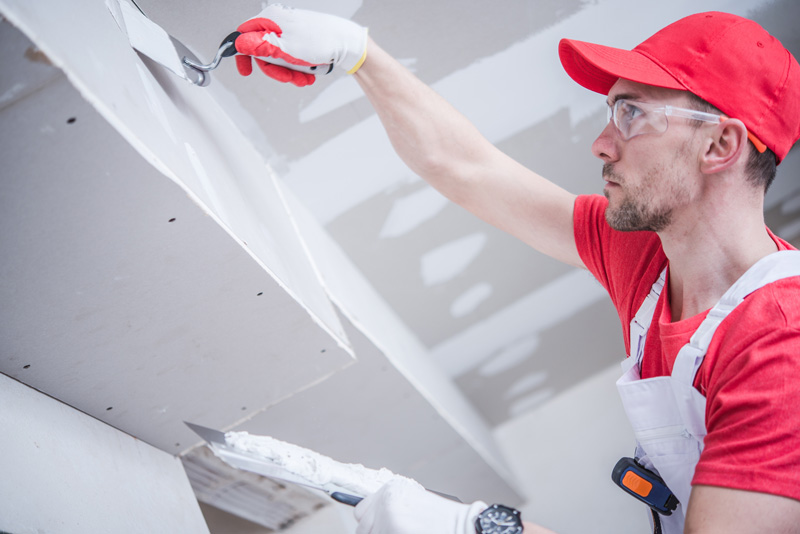
Drywall comes in 4 x 8 foot sheets and is quickly hung by drywall hangers. This is the process of attaching the drywall to the bare stud of all inside wall surfaces as well as the ceilings. Holes are cut for all receptacles and windows and doors. The mudders then come and tape all of the seams and mud them. This is then sanded down and provides the smooth surface that we are all used to in a new or newly renovated home.
Whether you are refurbishing an existing room or creating an addition, adding drywall is a great do-it-yourself project. Proper drywall techniques can make the difference in how a room looks, but with a few tips, you’ll be able to make your room look great. Most materials and supplies can be found at your local home improvement centre or hardware store. You will be able to save a lot of money by doing the project yourself, plus you’ll have the satisfaction of accomplishing your home improvement project.
Materials and Supplies
The first part of starting a drywall project is to ensure you have all the materials and supplies needed. Supplies and materials should be purchased based on the amount needed. Calculate this by determining the total square footage of the room plus ten percent to allow for waste. Divide this total by thirty to in order to use 4 x 8 drywall sheets, and round up to the closest number. You will then need joint tape, joint compound, screws and nails. For each 1,000 square feet, purchase 370 feet of joint tape, 140 pounds of joint compound, 700 screws and 700 nails. This will provide all the supplies and materials needed to complete your project.
The Right Tools
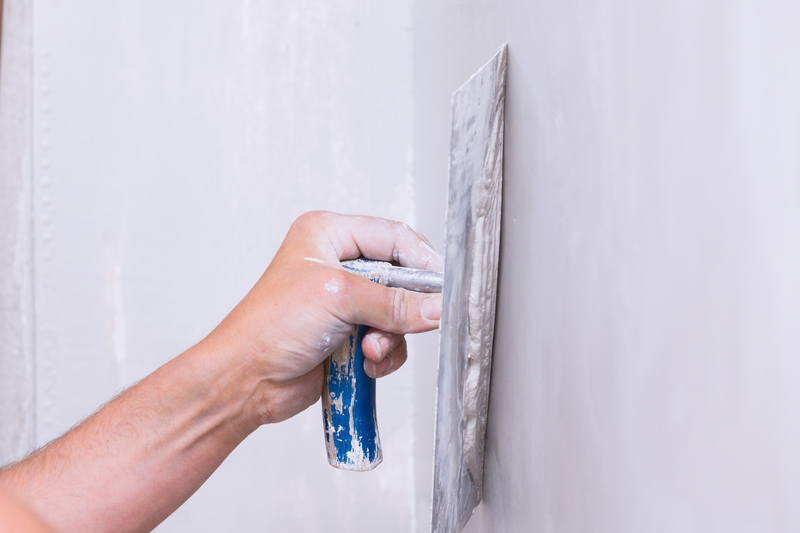
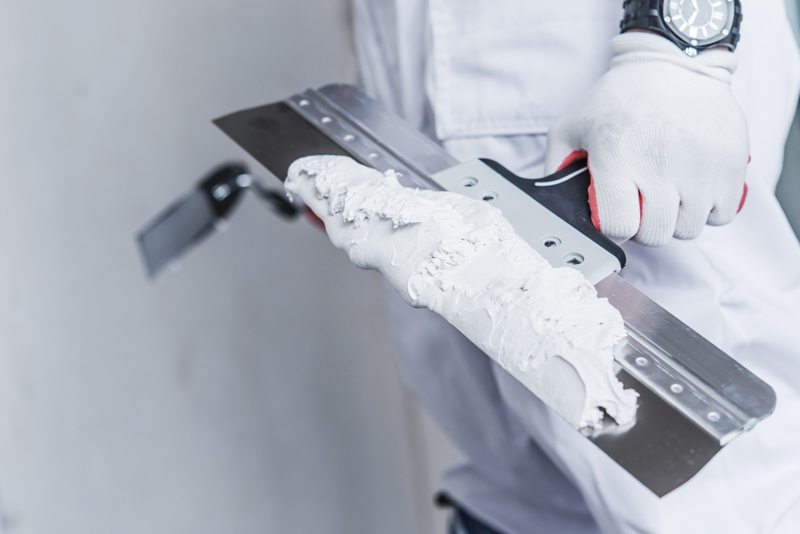
Having the proper tools is also necessary in successfully completing a drywall project. You will need a utility knife for cutting the drywall, plus a T-square for making properly aligned cuts. A saw is also handy for cutting out places for electrical outlets or other obstacles. A rasp can be used for shaving slightly over cut pieces but it is not necessary. Fastening screws and nails will require a hammer and screwdriver. It is recommended a power screwdriver be used. A taping knife is essential for finish work and helps spread joint compound. You will also need a sander to smooth all the seams.
Hanging and Fastening
Hang sheets from the top to the bottom, perpendicular to the framing. Check your local building codes for fastening requirements as these may vary. Use screws every sixteen inches along the frame and fill in with nails so fasteners are found every seven inches. Countersink both screws and nails for a more secure fit. Make sure to position joints properly. Hand cut joints should meet other hand cut joints and natural edges should meet natural edges.
The Finishing Touch
Once all the sheets are in place, you will start applying joint compound to the seams. Do not be concerned about using too much. Run the knife along the seam, pressing it into the space. Next, use tape, lightly pressing it from one edge to the end, centred over the seam. Working from the centre to the end, press and smooth the tape out. Apply a thin layer of compound over the tape so you can still see it. Then, fill in all the countersunk nails and screws with compound at this point. Allow this to dry at least twenty four hours before starting the next process. The next process involves more compound to smooth out all the edges from the previous step including the nails and screws. Allow this to dry another twenty four hours. The final coat will take some patience as you will want to make the edges completely smooth. Take care to ensure all edges are smooth and filled. Finally, you will sand the walls. Make sure to wear protective masks as there will be a lot of dust generated, and vacuum often to remove particles.
Once you are finished with the drywall project, you will be ready to prime the walls. Priming will help hide any imperfections and will give you an even surface for your final product. You may now choose to paint or wallpaper the walls to your taste. The entire process will take several days, including drying time and labor.
To drywall a home for repair is easier said than done; however, it is never as difficult as some lead you to believe. When you start to drywall for home improvement, you must follow a few straightforward steps. As for tools, you will need a Putty Trial, Tray, sandpaper and joint putty, scraper, hammer, paint, thinner, patches, plaster, and a few other items to finish the task. Of course, it depends on the size of the area as to what exact tools and materials are needed.
You will need sandpaper, since the drywall procedure starts by sanding down the walls and removing any lumps. You should sand until you see clear white area. You will need a cloth to finish the procedure by wiping down the wall removing any drywall dust.
Plaster comes in handy if there are holes in the wall, thus use the putty trial and scraper to apply the joint putty to fill in the holes and patch if applicable. From time to time, a second coating of plaster is required; repeat the course of action until the hole is filled and scraped down to smoothness. You will need to sand the plaster when it is dry.
Never start to drywall until you have sanded down the area, smoothed out the surface, and have washed the wall, freeing the area of any dust. Furthermore, make sure the region is dry previous to sandpapering the area. Start the drywall modus operandi by following the systematic steps provided to you in the kit purchased, and not until you have a clear smooth area.
Avoid the Simple Mistakes
You need to ensure that you avoid simple mistakes when planning and putting up drywall. Install the ceiling drywall before installing any walls. Work from top (ceiling) to bottom (floor). Try to run the drywall sheets perpendicular to the framing and mark joint locations so they are easier to find. If you can mark the stud locations on the ceiling and floor, this will be easier to fasten the drywall sheets. Check the plans for provisions for insulation, ventilation, moisture control and wiring prior to using drywall. Use dry wall nails or screws and cover the wallboard tape with compound. Make certain that you sand the drywall compound to ensure a smooth finish. If not sanded correctly, the bumps will show twofold when you apply paint. Most importantly, do not apply the drywall with the wrong side exposed.
After adding the drywall for home improvement, you are ready to paint. As a result, choosing the paint and brushes appropriate for the job will help you receive a desirable outcome. Paint the base line area before relocating any furniture in the home. Allow the paint to dry and touch up by re-arranging the furniture, curtains, and other items.
Opt for Repairs Over Makeovers
Dry walling is not difficult and does not require a lot of technical skill; however, it is time consuming. If your walls are in serious need of construction you might want to consider other options rather than dry walling and painting the area. Sometimes you merely cover areas that are deteriorating by adding new lining, paneling, and covering. Checking into additional options might benefit you while saving you money and time.
Sometimes you can get away with repairs rather than entire makeovers. If the walls are layered, a bit of plaster or spackle and other tools and materials could dress the area. If you have rotted area, you may want to consider other options, or else hire a drywall contractor expert to repair the home. There are times when you cannot get away with home improvement by doing it yourself. You may need assistance to prevent deterioration and save money.
If you notice areas of the home that are starting to show wear, taking care of the problem now will save you the headache later. Dents, cracks or holes in the walls can be repaired by buying a plastering or spackling kit and following the instructions to repair the problem.
For repairs, you will need paintbrushes, knives, spackle, latex bonding liquid, paint, patching plaster, sandpaper, fiberglass wallboard tape, and that about sums it up. For holes, you cover the area with the wallboard tape and then spackle to make the tape stick.
After the spackle is applied, use your sandpaper to sand the area repaired until it is smooth. If you notice peeling, paint or loose plaster around the area, use your scraper to remove or clear it up. After the spackle starts to dry and is sanded, add a second coating to cover the hole entirely. Again, sand and prime the patched area. Finally, you are ready to paint.
These types of home repair materials are affordable, and you will feel satisfied tackling the project yourself.