When laying a new floor, you will need to remove all furniture and appliances from the room. Do not attempt to merely move furniture from one side to the other because you will need space in which to maneuver. Also, the floor will need some time to set once it is installed. So move out anything that isn’t attached.
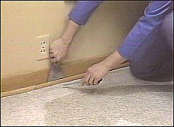 Remove the shoe moldings, trim pieces, door thresholds, and floor grates carefully, using a pry bar and a scrap of wood for a leverage wedge so as not to mar the baseboard. This will enable you to fit the flooring right up to the baseboard. Any minor imperfections along the cut edge of the new flooring will be hidden underneath the molding when you replace it. Also, the underlying floors need to be smooth and free of grease, dirt, and any irregularities. Clean the floor well.
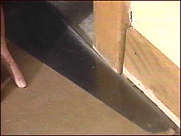 A scrap of cardboard will support your handsaw so you can undercut the bottoms of the doorway moldings to allow for the flooring to slip underneath. Keep the saw blade flat against the cardboard when doing this. If your floor is level, dry, and structurally sound, with an even finish, you will need no other prep work than to sweep and vacuum thoroughly, then mop the floor with a mild cleaner. If the flooring will have a seam, the 6” strip of floor directly under the seam should be very dean and free from any wax or finish so the adhesive will have something to hold on to. Use a heavy-duty detergent or wax remover to dean this strip. If the floor is badly sloped or dipped, fill those areas in with leveling compound. Install an underlayment of 1/4”plywood. Plan the seam so they do not match those of the flooring underneath.
 Over an open joist system, first apply a layer of 3/4” tongue-and-groove plywood as a sub floor. Check local code for specific recommendations. Nail the underlayment with 6 penny ring shank nails every 4” to 6” around the edge and every 4” in the middle. Check local code on this requirement as well. Leave 1/4” gap at the baseboard and 1/16” between sheets to allow for expansion and contraction of the wood.
Check back for more tips.